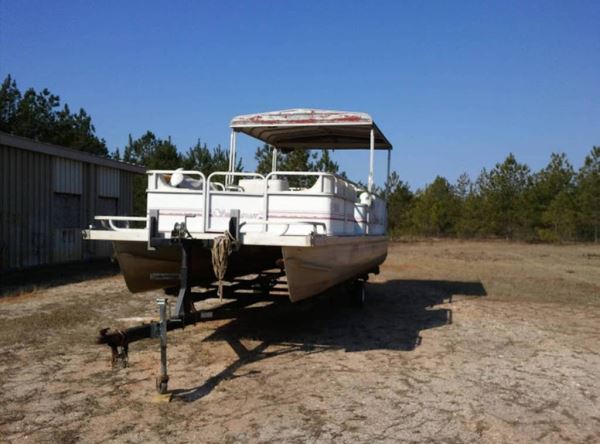
To quote the latest James Bond 007 movie, my hobby was resurrection. I'm in Dadeville, a small town in east central Alabama, near Lake Martin. I resurrected a 1985 Sundancer 24-foot pontoon boat with a mysterious 90hp outboard motor. I documented my progress on the PDB forum for those who care about such things; my avatar is Hottommy.
The before shots weren’t pretty. The carpet and upholstery needed work. The structure beneath the furniture was a mixed bag of bad and not so bad, but the pontoons and floor structure seemed sound. Before the project was done, I redid all the wiring, fuel system, transom support and paint. The roof appeared to have been grafted from another source and needed both structural and cosmetic attention. The good news? The trailer seemed relatively new and sound. My goal was to have the boat in the water within four months.
Replaced Or Reused
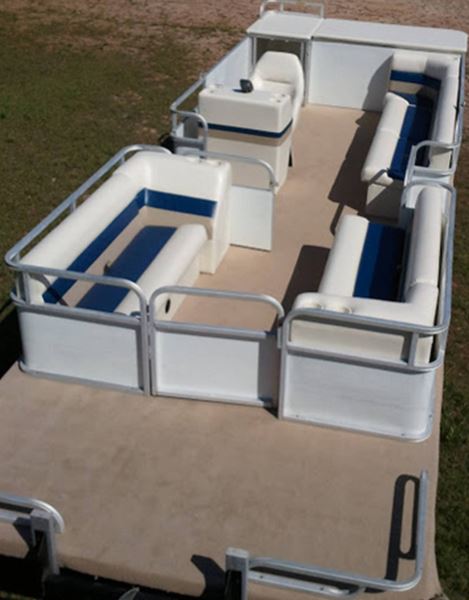
 In order to do it right I replaced all the furniture, the helm console, the box for throttle assembly, the carpet, swim ladder, all rubber hoses, fuel filler assembly as well as the wiring and lighting. The good news is I was able to clean up, refurbish, and reuse the fuel tank, fences, deck trim, the helm seat pedestal, hardtop, steering assembly and the throttle assembly.
First Task
The motor was my first big challenge. I knew it needed repairs and service, but I first had to figure out what it was. All the original clues to its model and serial number were gone. At some point it was misidentified by a part number rather than its true serial number, so it took some detective work to figure what parts were needed. But the Internet was a wonderful thing, so it was just a matter and time and effort to solve the mystery. The engine cover says, "Force by Mercury Marine." My research led me to believe the motor was from the 1994 to 1999 era.
Work on the motor was stalled while waiting for the arrival of a new starter. But I was anxious to find out if the compression was good. So I pulled the plugs (they looked normal), opened the throttle and spun the engine using the old rope start method. Now I'm old and not very big, so I was very pleased to get at least 100 PSI out of each cylinder.
 A Good Shop A Must
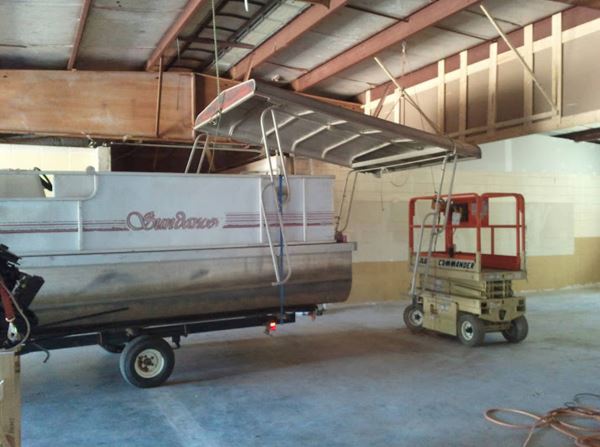
I had to remove the homemade hard top. Having a good workspace and the right tools is a must when you do most of your work by yourself. My workspace was on its way to becoming a big garage when the pontoon boat urge struck. I fought it off for a week or two so I could keep working on the garage, but when the right boat deal came along, I jumped at it.
Next, I removed the edge trim and removed the front fences and seats. Once they were free and could be examined from all sides, it was clear the inner structure of both front seats were too far gone to attempt a repair. I started searching for the best deal on replacement seats. When I got half of the aft part of the deck cleared, I made a cool discovery. I figured out that the strange device in one corner was a pop-up changing room that was now without its fabric walls.
The only metal damage I found was a cracked weld where the engine pod attached to the main part of the hull. It was about 5 inches long and was easy for a welder to fix. The wooden transom was also replaced. I ended up finding someone with brand new pontoon furniture that he no longer needed because he sold his boat after he ordered the furniture but before it arrived. It saved me a few bucks.
Carpet Battle
I began the job of stripping the factory original carpet from the deck. It didn't take long to discover that I had neither the strength nor stamina to pull up the entire carpet by hand. After I got about two feet on the front end of the deck up, I decided to look for an easier way. I wrapped several turns of loose carpet around a 10 foot long 2 by 4 and then clamped a second 2 by 4 to the first one to hold the carpet. I tied both ends of the boards to a rope that was secured to a pole. As I slowly pulled the boat/trailer forward with my truck, the carpet peeled back from the deck. Except for a few places where the top layer of deck laminate peeled off, it removed virtually all of the carpet from the glue that once held it to the deck.
 The next question I faced was whether and how to remove the glue from the deck. As I searched for information on carpet, I kept seeing glowing recommendations for vinyl flooring, which got me rethinking my choice for flooring. I've concluded that I'd rather replace the deck than try to remove the carpet glue. I had to find that balance between something affordable on my budget, not too hard to install, low maintenance, and something that won't burn the feet of barefoot kids. I decided that marine carpet from iboats.com best fit my four criteria.
Engine Work
I moved back to the engine to replace the fuel pump and remove the carburetors. I cleaned, rebuilt and installed all three carburetors. Two of them looked like they didn't need much, but the third one had a loose main nozzle. It was completely unscrewed and was being held in by other parts. I guess that's why it's good to do all these routine maintenance jobs now rather than when problems arise during a day on the lake. I also replaced all the fuel lines and filter. I then installed the new starter and began working on the missing and damaged battery cables. It would have been a quick and easy job if I could figure out how to drop the bottom half of the cowl. But I couldn't, so it took quite a while.
I finished installing the new battery cables and started thinking about hanging the motor back on the boat. But when I started gathering up parts to install the new transom I built, I discovered the aluminum top cap was missing. I know it was either hiding in plain sight, left somewhere it shouldn't be, or it was lying beside the road somewhere after it fell off the boat while I was taking it to the welder. Because I couldn’t find it and didn't know if it would ever be found, I went looking for a replacement part. Fortunately, I found one at a really cool metal working shop that I didn't previously know even existed. Before the day ended, I was asking them for a quote to build new support brackets for the hard top. (Lemonade out of lemons, I guess).
Trial Fitting
From there, I spent some time trying to make the new transom fit. It seems there are no square corners so it was very difficult to drill holes in the new transom (wood) that align well with the existing holes in the metal bracket that holds it. But after quite a lot of in-and-out trial fitting, I was able to get it aligned. The next challenge was to align it with the motor mounting holes. I was able to hang the motor on the transom and get most of the motor connections reattached. The only casualty was the old, hardened speedometer hose that was supposed to attach to a fitting on the lower unit. I knew I would need a new one so I could see how slow I’d be going.
Fire ‘er Up
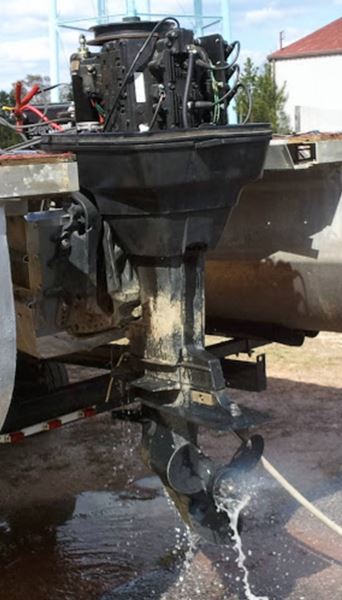 My first effort to test run the engine came to a premature halt when priming the fuel line revealed a significant leak in one of the carburetors. I removed the carburetor and diagnosed the problem as a sticking/maladjusted float valve. With everything put back together, it fired up on the third crank. Other than a faster-than-expected idle speed (sounded like 1500 RPM to me), everything seemed okay. Water was coming from the exhaust in the center of the propeller, and from the small hose that runs from the top of the powerhead to the water temp gauge. However, I never saw water come from the hose on the aft side of the thermostat housing. Even after I ran the engine for about 10 minutes at idle, the thermostat housing did not feel especially warm to the touch. I was able to slow down the idle to what seemed right to my ears (800-1000 RPM) with an adjusting screw.
I turned a spare 55-gallon drum into a test pool for the motor. With the water well above the lower unit, I started the motor and observed and saw no stream from the P-tube. Knowing the tube was brand new, I decided to check the fitting on the thermostat housing to see if it had some debris in it. I pulled the hose off and found nothing in the fitting. With no better idea, I decided to blow into the tube to confirm it was open. It was blocked! I pulled the small plastic fitting from the other end of the hose and examined both openings. I held the fitting up to the sky and looked for light coming from the other side. Nothing. A small clot of red clay was blocking the fitting. I shook my head as I recalled all the advice from those who warned about such things. But my self-loathing for not having learned more quickly was rapidly replaced by excitement as I reassembled the freshly opened P-tube and fired up the motor.
With the P-tube mystery solved, I quickly tuned the carburetors and set the idle. I also tried out the shifter and everything worked well. For all intents and purposes, I decided work on the motor was finished until I put the boat in the water and could try out the higher power settings.
Moving Forward
 Relieved of the concern that I might be working on a boat without a good motor, I dove headlong into the task of cleaning up the fences. I intend to paint the parts that could be easily seen, so I was concerned about getting a good surface to paint. I wasn't confident the pressure washer alone would be sufficient, so I coated one section with a good paint and epoxy remover gel. After a few minutes, I pressure washed it. I went on to pressure wash the rest of the fences without using the paint remover. I could see the top layer of chalk-like paint washing off to leave a good flat finish that should hold paint well. It turned out that the task of prepping for paint wasn’t as difficult as I imagined. The most challenging task was removing the old striped decal that circles the fence. My plan was to remove the flaky parts, paint over the rest, and then cover that area with an entirely new decal. I figured it would minimize the effort required and yield a decent-looking boat.
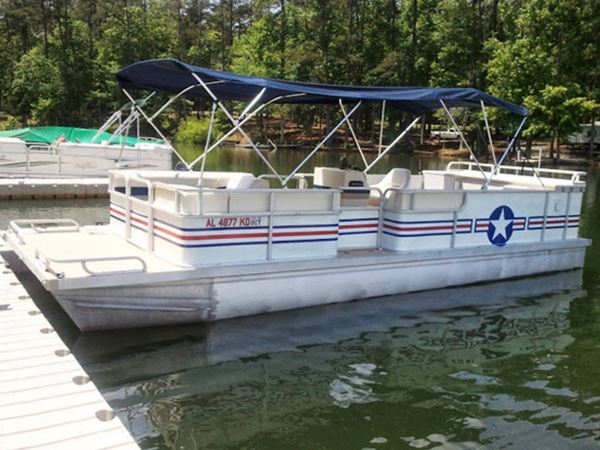
My next big task was prepping and painting one section of fence. As with all paint jobs, the prep was the hard part. What I didn't fully anticipate was how long it would take to mask the square tube framing around the sheet aluminum panels. It took more than an hour and about 50 yards of painter's tape to mask everything. By comparison, the painting was quick and easy. I used Rustoleum White Hammered spray paint. The white turned out to be very close to the original color, and the hammered effect worked well with the dimpled texture of the fence sheets. I was able to do all of the exterior face and some of the interior with a single can.
Up Top
The top for this pontoon boat project is a custom bimini top supported by elements of the two frames I already had, covered by a home sewn top made of Sunbrella fabric. When I went looking for fabric for the curtain, I discovered I had enough leftover Sunbrella fabric. The fact that I used it reflects the fact that I seldom throw away something I think can be used in the future. I'm cheap, and I enjoy finding ways to reuse stuff I have lying around. One of the things I had lying around was the aluminum frame for a bimini top that someone left behind at a rental house I once owned.
 Final Touches
I also installed new gate latches, but not the typical pontoon boat-style latches. I didn't like the design, materials and the cost of the items widely sold as replacement gate latches. So after considerable research, I went with what was commonly called a ball latch or bullet latch. Installation was not much more than drilling some holes and inserting two screws. The best part was that it required no handle or lever to work. You simply push on the gate to open or close it.
In the end, I wrapped up several small jobs. I installed the GPS mount and ran wiring for it. I also rerouted a wire that was in a bad place. Later I moved the ladder cups to fit the new ladder, and I finished installing half of the aluminum trim that wraps the deck. I also sewed up covers for the captain's chair and the helm console.
Test Run
 The boat (and motor) passed its initial lake trial with only a minor problem. I discovered I had failed to tighten a few fittings on the top when it tried to stow itself as I approached 15 mph. I stopped the boat, reset the top and tightened everything.
I later got up to 23 mph with no problems. I was not yet at full throttle, but it seemed fast enough for my first outing. It was smooth, comfortable and quiet enough to carry on a normal conversation.
I spent the first afternoon with my nephew and three of his daughters. We tubed, swam and picnicked. Everything worked as hoped. It was a glorious day, and well worth the time and money invested in the boat. I encourage anyone else who is considering resurrecting an old pontoon boat to give it a try.
Rebuild Facts
- Total cost of repairs and upgrades: $4,000
- Most expensive part: Deck furniture $1,835
- Cost for labor I had done by others (welding): $50
- Cost for motor maintenance/repair parts: $315
- Most unpleasant tasks: painting fences, cutting holes in furniture, sewing the bimini
- Most challenging problem: finding the blockage in the P-tube
- Most fun part: having new problems to solve every day
- Most gratifying moment: when water flowed out the P-tube
- Vision that kept me motivated: screaming girls riding on a tube behind the boat
- Key to getting it done in 66 days: sharing my progress on the PDB Forum at www.pdbmagazine.com