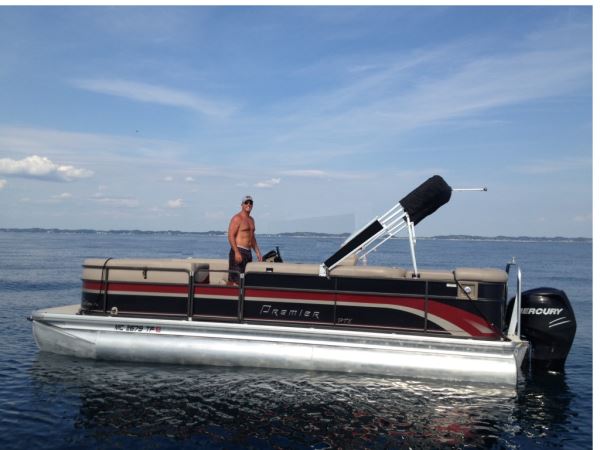
At the very end of the 2012 boating season, I became a proud owner of a gently used Premier Sunsation triple ‘toon with the PTX package. The original owner turned out to be an old friend of mine. The whole buying experience was a breeze, as my friend was very particular about his boat use and its regular maintenance schedule. In fact, when I brought the boat to my marina, many people thought it was a new boat even though it was built in 2009 and had over 80 hours on the Mercury 150 Verado outboard.
 Everything on this ‘toon was in immaculate condition, except for the aluminum pontoons which were turning brown due to the aluminum oxidation. I wanted to do something to bring the three logs to their original finish and after spending endless time researching options, I came across Sharkhide aluminum cleaner and protectant. Before ordering a complete kit, I had a chance to see a demo and the results were fascinating! The demo boat was used for more than a year and the pontoons still looked like they were brand new. The following morning I contacted Clint Bland, the owner of Sharkhide, and ordered a kit with the aluminum cleaner, polishing paste and metal protectant.
Preparations: Get The Right Stuff!
After the order was placed, Sharkhide furnished a comprehensive list of necessary supplies to ensure successful completion of a multi-day project. Bland was adamant about a quality, variable speed, orbital polishing power tool, preferably a corded Makita tool. I was glad I followed his advice because it performed flawlessly. Orbital sanders without RPM selectors will not work as well because it’s impossible to find the perfect RPM setting and keep it consistent for many hours. In addition, I purchased three gallons of paint thinner, lots of heavy-duty paper towels, wool orbital sander pads, one spray bottle, rubber gloves and a pack of Birdseye weave cotton baby diapers. At this point, I had all my supplies and tools and the only remaining item was a dry weekend to complete the project.
Execution: Invite Your Boating Buddies!
I consider myself a handy person so I figured all I needed was a quick rundown from Bland. To my surprise, he told me he would walk me through one step of the project at a time. Initially, I found this rather strange, but as the project went along, I was very grateful for his meticulous step-by-step approach. I hope this article will give you a better overview at what it takes. However, it should not be taken as a substitute for his methodology and coaching. Any shortcuts or deviation from his recommended preparation and application tips will result in less than desirable results.
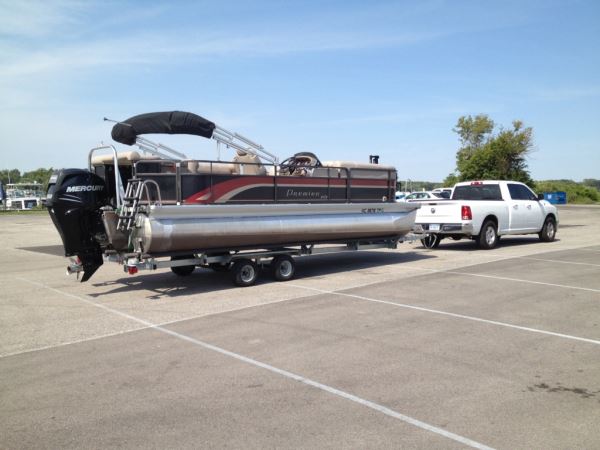
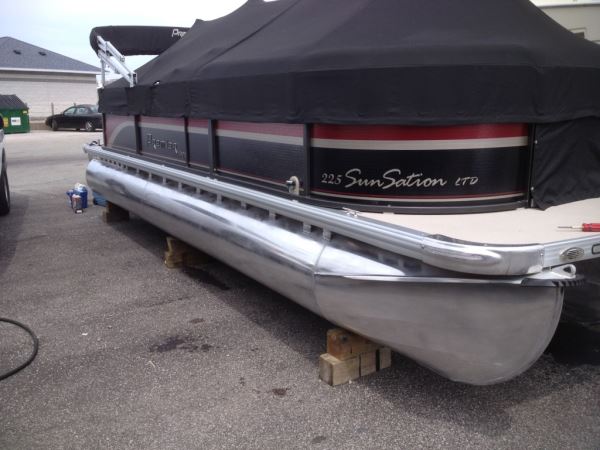
In my case, I spent close to three days working on my 23-foot Premier with substantial help from two buddies. On the first day, the boat was pulled out of the marina’s winter storage building and placed on 1-foot tall blocks.
Once the boat was lowered on the blocks, I completely remove the aluminum "skirts" or strips, from the outside pontoons. These 4-inch high aluminum strips were held with 20 self-tapping screws on each side. In case you cannot remove these sections, make sure to put enough masking tape to cover them all the way. Also, try to find a shady area or at least work on a side of the boat that is not exposed to direct sunlight. This process is 75 percent preparation and 25 percent execution.
Step 1
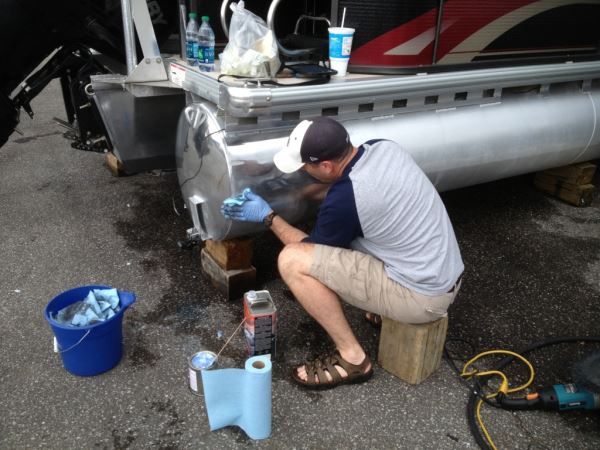
 Per Bland's advice, I mixed one part of the cleaning solution with two parts of water in a spray bottle. Good chemical resistant gloves, safety glasses and a long sleeve shirt are a must during this process. Make sure to have your water hose ready and some paper towels close by.
Initially, I tested the whole process on the center pontoon behind the motor before moving on to the more visible parts of the boat. Dry pontoons were sprayed from the bottom up at a 4-foot long section. We started at the bow, followed by the stern section on the same side, leaving the middle untreated. The same technique was used on the starboard side. In the end we came back to the port side and cleaned the middle section. It is important to note that this cleaner works on dry aluminum only. My friend Brian was in charge of the washing and drying, while I was applying the acid mix. There were some areas especially on the very bottom of the pontoons that were treated more than once. Working on the center pontoon and inner surfaces of the outside pontoons involved some crawling, so wear clothes you can part with. In little less than two hours my boat looked like the day it came from the factory!
For More PDB Features, Exclusive, and News, Subscribe today!
Step 2
 It was time to get the Sharkhide owner on the phone again and get his instructions for the polishing phase. As I was getting anxious to see some results, my first attempt was focused on the end caps of the pontoons. The immediate gratification was hard to explain as those two areas looked like they were chrome plated after running the wheel for a few short minutes. At this time, our undertaking started to gather attention of the marina captains.
The pink polishing paste was applied with a paint stir stick in very small quantities as we worked one linear foot of the pontoon at a time. Less RPMs and less paste produces better results. Also, less paste will result in less polishing wheels used. We went through three of them and kept the RPM selector on the slowest setting. Make sure you have a seat low enough so you can sit down and run the wheel in a somewhat comfortable position. My friend Bernie joined us on the second day and he was in charge of finding any areas that we're not perfectly polished. A bit of the paste and a few runs with the wheel took care of those imperfections.
This process will take some time, and that's where your friends will play a key role. Be careful when working on the inside surfaces and the center pontoon. There is not much clearance and the polishing wheel tends to kick towards your face as it grabs onto the next section of the unfinished aluminum.
 As one person was running the wheel, the rest of the crew was focused on cleaning freshly polished areas with the paint thinner. Every inch of the polished surface had to be thoroughly cleaned with many paint thinner-soaked paper towels until there was no more black aluminum residue on the paper. We used close to three gallons and I went through eight rolls of paper towels. Looking back, I was fortunate to have two detail-oriented friends around, as they were able to point out areas that needed extra attention. After being thoroughly cleaned, some areas required additional polishing and then repetitive cleaning. Areas that don’t get 100 percent cleaned will develop black streaks when the final protective coat is applied.
Step 3
 At the end of the second day I made one last call to Bland and got the final set of instructions. Protective coat was applied with the baby diaper and went on very quickly. It is almost a reverse process from the acid cleaning step. You soak the diaper with the metal protectant and run four linear feet at the time—top to bottom this time. Then you move to the next area away from the initial spot and take care of it. In essence you move around the boat and cover different areas so they have just enough time to dry, and then you eventually connect all the sections. In my case, I applied a second coat. However, it has to be done within 48 to 72 hours after the first coat is fully cured.
Conclusion
Would I do it again? Absolutely!
I get so many compliments it was easily worth the time and money invested to do it. Sharkhide finish is easy to keep clean and I’m sure it will add to the resale value. Bland’s knowledge helped me complete a rather elaborate project very quickly with better than expected results.
The Details
Sharkhide Kit: $400
Supplies: $100
Makita Sander: $200
Man Power: 3 Guys
Time To complete: 3 Days
www.sharkhide.com