Sunscreen, Bimini or both? It all started with a trip to my local dermatologist to get a couple of small spots checked and discuss concerns about skin issues. I’m okay; thanks for the concern. But in the end it was all about the topic of covering skin and being in the sun. And think about it, what better place is there to be in the sun than on a pontoon or deck boat?
Yes, I realize that this sun protection advice is coming kind of late in the season for many of us, but I thought it might be a good time to start thinking about next season and how you can protect yourself. Don’t forget, it’s not just the people that need protection but also the pets. In our case it’s our standard poodle who really likes to go out on the ‘toon, but doesn’t like getting too hot. He gets sunburned through the fur, so it’s just as important for dogs as it is for people.
Have you ever invited friends who have said they “always want to go out on the boat” but once there, start the whining about how hot it is or there is too much sun for them enjoy their time on the boat? Whiners…
Anyway, there are options. One is clothing to cover the skin and hats for you head. Personally I have a commercial hat tree filled with many different hats. A person needs lots of options in hats because there are a lot of variables when picking which one to wear. Weather, occasion, jeans or shorts, you get the idea. UV protection in clothing, especially boating attire, is more important than ever before. Fabric that protects is a start, but often, clothing just isn’t enough. Sometimes it is just too hot for more clothes or lots of spray on protection.
Another way to protect one’s self from the sun is with an umbrella, but that’s not always practical and doesn’t cover very many people at a time, although a patio umbrella mounted in a table mount in the front deck might be pretty cool to have. Not sure about how it would last in the wind or under power, but I may have to try that sometime just for fun.
And then there are Biminis. My boat came standard with a rear Bimini. And on our Bentley Cruise 200 we have a pretty good sized Bimini, about nine feet, which provides a fair amount of sun protection.
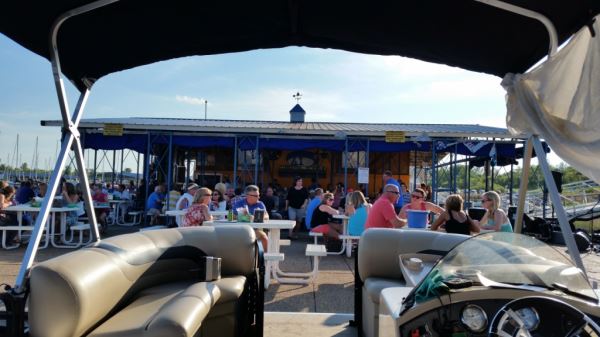
But not enough! When we are beached for the afternoon or relaxing at the local marina bar it is nice to have a little extra shade to hide from the sun. Often people show up and want to hang out on the ‘toon while the band plays, which is a great, but the layout of the marina docks puts us right in the sun for the evening. So to help keep us and our friends comfortable we looked for alternatives for more sun protection.

Adding a second Bimini was the decision. So, other options? I tried the Taylor Made Pontoon Gazebo. I actually still have this unit and it worked great for shade when we were beached. It was not very expensive (about $175), easy to store and easy to install. The poles were fiberglass tent-style poles with elastic cord holding them together. So once the small mounts were mounted on your rails, all you do is unwrap the poles, feed them through the mounting straps in the gazebo cover itself and arch them in place. Snap the small retaining straps to the plastic eyes and voila, you are in the shade.
You night not believe it, but I am one of those guys that really doesn’t like drilling holes in my boats, cars or motorcycles, yet I like modifying almost everything I own. I bought a brand new Catalina 22 Capri sailboat and owned it for 10 years and refused to put anything through the hull or onto the deck if it meant drilling holes. I used a handheld electronic depth gauge because I didn’t want to install anything in the fiberglass.
So in the beginning I didn’t want to install the permanent mounts to the rails as the gazebo instructions recommended. It meant drilling holes in my ‘toon rails and through the powder coating. Not going to do it. Oh and the mounts might mess up my cover. That’s my story!
Anyway always being the innovator (sometimes called lazy), I tried a few different installs. Instead of mounting the official pole mounts I just placed the ends of the poles inside the boat and used zip ties around the rails. Then snapped the retaining straps to the zip ties and again I was in the shade.
I also had a four pack of the really cool Quick Clamps made by Bimini Buddy that I used for fenders and other stuff, so I mounted the pontoon gazebo pole mounts to those quick clamps and then installed the clamps to the rails.
Toon safety tip time: if your pontoon rails are like mine, there was an extra trim piece installed for looks on the outside of the rail. It’s just a small 1/2-inch wide decorative trim about 1/8 inch or less thick. But this trim piece made the Bimini Buddy Quick Clamp not fit right. I had to modify them slightly, which in DIY language means I had to grind down some of the clamp face so the gripping edge would keep the clamp in place.
Want to know how I found out that this modification was needed? I had the arched pole (which is under pressure) from the Gazebo launch one of the clamps off the rail and out in the water, never to be seen again. After watching the flying clamp sink I felt, well, pretty stupid. I should have figured that out before I lost the clamp, but oh well.
Even though the gazeebo provided the needed shade, it had a few drawbacks. It was pretty low, it was pretty flexible and it was not very sturdy in a breeze. In a no-wind situation, you could motor extremely slowly with the gazebo up. But any sort of breeze or speed made it unstable with the risk of flying way or being damaged.
So my next decision was to buy a second Bimini. I shopped all the Bimini supply houses and priced the entire component list but decided it looked like a bigger challenge than I wanted. I think to mount the Bimini correctly to the rails wasn’t a big issue; it was the potential that I would need to modify the existing Bimini to connect the two together to make it look right. I think they should connect in some fashion like zipping or snapping.
And then there was the issue of the boat’s cover. It too would need to be modified for the second Bimini. I am already unhappy with a standard cover because it doesn’t really protect the interior around the Bimini mounts.
Probably the easiest way is to order your boat with a second Bimini. If I were to do it over again, I think I would get the front Bimini from the dealer/factory. Again, the reason I say that is because if I add a Bimini after the fact, my snap-on cover has to be modified. From the factory the cover is made for two Biminis.
So in the end, I returned to the Bimini Buddy website and put an order in for a portable, easy-to-install Bimini Buddy. If you watch the video on their website, it looks simple to install and use. I ordered a black one and was very happy when I got the box and opened it up. It looked good, was well-made and matched my existing Bimini. Even our dog was excited for this new shade.
Our install went sort of like the video. The parts are numbered and snap together. The push button snaps always pinch my finger (one thing I don’t like) but hold the Bimini parts together without any issues. The rear part of the Bimini Buddy overlaps the front of the regular Bimini. With adjustable straps on the corners you can snug the Bimini Buddy to the regular Bimini frame and unless it’s really windy, the overlap seems to stay in place.
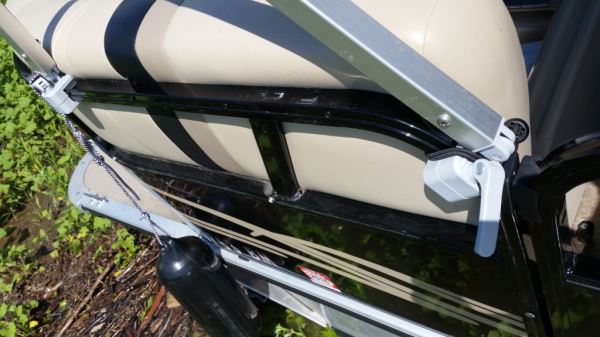
Remember my clamp issues? I had to go through that again with the Bimini Buddy. I expected it to be an issue so was prepared. I used my Dremel tool and did a little modification on the clamps to help keep them tight on the rails. We used the Bimini Buddy for one season with the clamps.
There were a few other issues with the clamps. To get the Bimini to fit on my boat meant mounting the clamps on curved sections of the rail, because my boat is only a 20-foot boat. So even with the modification to the clamps, they would not stay attached very well. I would tighten the Bimini Buddy clamps on to the rail and then I would wrap a flexible cable tie around the clamp. I learned my lesson; no more loose clamps for me.
Because of the difficult time with the quick clamps we needed to keep an extra eye on them when it was windy or under power. We could actually motor with the Bimini Buddy in place and most of the time it was not as problem. But if there was a little breeze someone had to stay close to the clamps to make sure they didn’t pop off and let the bars scratch the rails or damage the cushions.
But, overall I would say the Bimini Buddy was a success. It provided shade. I stored the parts in the back of the boat. I actually hang them from the rails on the inside of the playpen with black webbing straps, which keeps them handy and out of the way at the same time. But I was never completely happy with the mounting system.
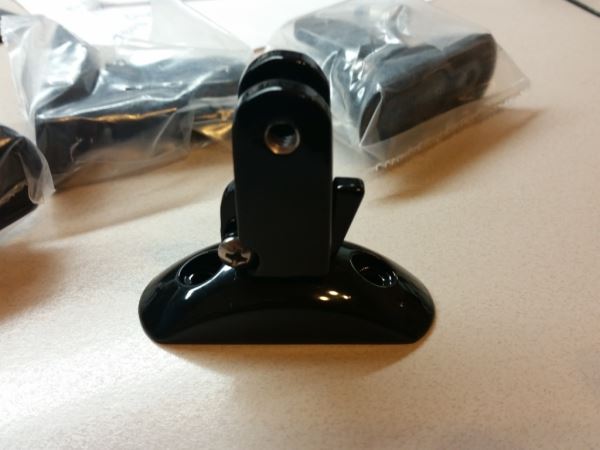
So then I started on my next modification. I ordered four of the surface-mount Bimini quick release hinges from Accon Marine (www.acconmarine.com). I don’t think they have the exact ones I used listed anymore, but search the internet or go visit your dealer; there are lots of options. I also bought four plastic square eyes for the down tubes off the internet. I need to mention that I did call Encore/Bentley and they had changed their new boats to a quick release version but it wasn’t exactly what I wanted. In fact what I really wanted was the small button style clamps on some of the newer boat. But I didn’t want to pay the cost for those at this time. Maybe on the next boat.
First we removed the Quick Clamp mounting hardware that came with the Bimini Buddy and installed the square plastic eyes in place. Next we installed the hinge onto the eye and snapped the mounting base in place.
I used a piece of duct tape on top of the rails to protect the powder coated finish and give a better surface to mark the location for drilling. We put the Bimini in place where we wanted and using more duct tape, secured the base mounts in place on the rails, adjusting it to the desired location. Using an ink pen I marked the holes and then after removing the Bimini I used a an automatic center punch to mark the spot for drilling the pilot holes.
When taking on a new project like this I find it is easier to buy the drill and tap combination set rather than digging through my drill bits looking for the correct size. I have a complete set of taps and dies, but they are getting old and I decided just to buy new. You will also need a supply of stainless bolts (make sure you get the correct heads to match your base mount holes, flat or countersunk) to mount the quick release hinges to the rail.
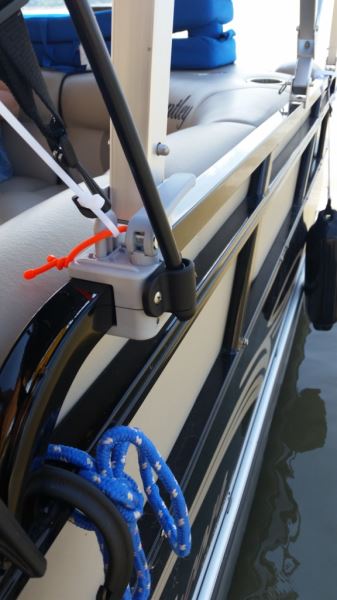
I like to use my Ryobi Cordless drill with the tap instead of the drill bit to thread the holes in the rails. You need to be really careful using the tap in the drill. Use a slow variable speed and do not overpressure it when making the threads. Let it feed itself. Often it’s easier to remove the tap from the chuck after you have threaded the hole and back the tap out by hand. Once you have the holes threaded, I use Lock Tite on the threads and silicone under the hinges to seal the rails. Mounting all the Bimini hinges took about an hour.
There was one more modification to the Bimini Buddy: I mounted our Bimini Buddy as far forward as I could, which doesn’t give me a lot of overlap. So I put a single snap in the center of the back section of the Buddy and on the center front of my existing Bimini. It helps me line up the center of the two Biminis and it keeps the Bimini Buddy from slipping under the main Bimini.
As far as the extra Quick Clamps, don’t worry; I put them to a great use. I used them to tie the ropes that hold my fenders to the rails. Because they were tied on, I also let them hang from the rails all the time. That can be a bad thing; they bounce against the side of the boat, splash water and sometimes in a big wave fly over the rail, into the boat, which is dangerous! Now that I have extra Quick Clamps I have tied my fenders to the clamp and quickly put the fenders in place.
Now the Bimini Buddy frame snaps into place, stays in place and doesn’t move in the wind. We can remove the frame and store it in the back and the playpen cover fits without any modifications.