Many pontoons already have hydraulic steering, but not mine. So I thought I could either buy a new boat with hydraulic steering or just add hydraulic steering. Buying a new boat would be cool but expensive so instead I saved money and added hydraulic steering to my existing boat.
Before I get into the install I’ll share a bit about my process for buying my current boat. Let’s start with a definition for “practical.” My two favorite definitions are: “relating to what is real rather than to what is possible or imagined” and “appropriate or suited for actual use.” The second one is important. Is the boat appropriate and suited for me and my use?
For years I have given seminars around the country on the practical aspect of buying and owning boats. My seminars are based around these definitions of practical.
One of the best things I can do before I buy something is give one of my seminars. My recommended buying analysis does include what I personally want to buy, but it spends more time on how the boat is used, how many people are on the boat, where I am going to use the boat and how much it costs. Doesn’t mean I can’t buy what I want and spend whatever it takes to get what I need, it just helps put the decision in more of a practical perspective. I try hard to live by my own recommendations. Which is not easy with my ego; my first choice for anything is the newest, fastest, highest horsepower and most gadgets I can find. But the reality of being married to a recovering accountant for 30-plus years slowly creeps and practicality becomes more important.
For over nine years we had a 22-foot Catalina Capri sailboat big enough for us, the dog and a few friends. Nothing fancy, not even padded cushions in the cockpit although we did have a porta pottie (or cat box, depending on what kind you use). When we bought the Capri we looked for and found something we could trailer, enjoy and felt comfortable with.
We had a great time with the sailboat but things change. The room and comfort wasn’t what we wanted anymore. In my opinion, sailing is actually quite a bit of “work” compared to power boating or “tooning” in particular. From the rigging to the sail adjustments, it is a constant activity, even for a leisurely sail around the lake. Sailboat owners will tell you it’s not a big deal to unfurl the headsail and relax in the catbird seat…until you need to tack, or the wind comes up and you need to release the sheet. It seems like sailors are always fiddling with something.
But, as I was saying, we sold our sailboat and we went shopping for a pontoon that would carry us, the dog and a few friends. We were going to keep it in the same slip as the sailboat and it needed to be light enough for the vehicle we owned at the time to pull and I wanted a four cycle outboard motor. Also, no one in our group was into water sports (skiing, wakeboarding or tubing).
Since I do a lot of my own projects and maintenance I wanted an outboard because I was tired of the winterizing and maintaining required on an inboard/outboard. As a side note, I started out wanting to buy a used boat, but in the end I couldn’t find anything that suited me in a price I felt was appropriate. Guess I was too picky. Plus, the season was starting and I didn’t want to spend all summer on a rebuilding project and miss out on lake time.
So I started shopping a number of different brands and I bought a new Bentley 200 Cruise SE with a 60 horsepower Mercury Big Foot outboard. Some have said that the Bentley is a midrange or lower boat. Maybe, but in our comparisons we were pretty impressed with what we have for the money. Good quality, lots of features and reasonably priced. The boat is perfect for the way we use it. Small enough to handle on and off the trailer, fast enough to get me back to shore when needed, roomy enough to entertain and big enough for our lake. And we have pulled a friend on her wakeboard with no problems. It’s not a wakeboard boat, but it works. Just a reminder that you don’t always need a “big” pontoon; it all depends on your personal situation. You can buy a Corvette or a Miata; both are fun but different.
Back to the steering, there is almost always something I want to change on my vehicles and in this case it was the mechanical steering. There is nothing wrong with mechanical steering, especially with lower horsepower engines. But this boat was always hard to steer, usually requiring two hands to maneuver the boat. I looked at it, the dealer looked at it, and we could not find any reason it was difficult to steer. No sign of tight bends or binding areas or any other reason for the tough steering, although my wife did mention lack of exercise might be the reason.
So, what’s the easiest way to make the steering easier? Change it to hydraulic steering.
To begin with you need the hydraulic steering parts or kit. SeaStar Solutions (www.seastarsolutions.com) make the most popular hydraulic steering kits and the one for the 60 horsepower engine is the BayStar package. The total conversion was straight forward and only took a few hours. It actually took us longer because we were taking photos and video. Sometimes you need to put things back together to get a better shot of taking it apart. If you are looking at finishing a project in the shortest amount of time, I can definitely say don’t film it. In our case we probably should have hired a professional camera crew and actors, but the budget didn’t allow it. The videos will be posted on our YouTube channel, Wings, Wheel and Water.
But be forewarned, we made them.
In the BayStar kit you get the following items, reprinted from SeaStar Solutions.
The BayStar Steering Kit (HK4200A) Includes:
• 1 x BayStar helm pump (HH4314)
• 1 x BayStar Cylinder (HC4645H)
• 1 x BayStar Tubing kit (HT4420H, 2 x 20′ hoses)
• 2 x Hydraulic Steering Fluid (HA5430)
• 1 x Filler Kit (HA5438)
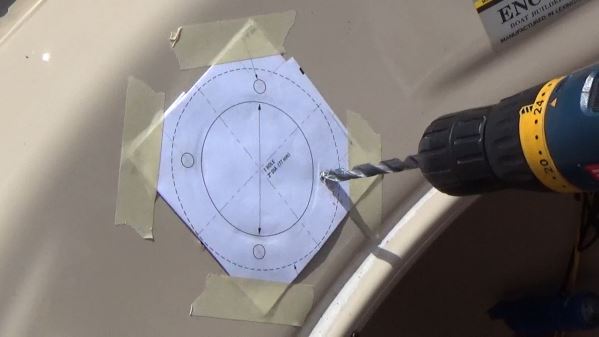
It doesn’t take very many tools to complete the install. You will need a three-inch hole saw to cut the dash area for the helm unit, a 5/16-inch drill bit for the helm mounting bolts, and of course a drill (I used a Ryobi cordless drill). The kit includes the mounting template to place on the dash to use for drilling and cutting.
You will also need a handful of combination wrenches for installing the helm, tubing and cylinders. It’s a short list; all of these are “inch” wrenches: 1/2, 9/16, 5/8, 11/16, and 1 1/8th. There are a few other things that might be needed like an adjustable wrench or big socket (a 15/16 socket and ratchet in my case) for removing the steering wheel nut and a rubber mallet to help with said steering wheel. I also like zip ties to hold things in place and some sort of wrap (I used water pipe foam insulation and rigging tape) or cable covers to prevent wear on the tubing from rubbing the deck or any edges.
Read the instructions a couple times and look at the pictures. The installation is pretty straightforward, but if you’ve never done anything like this the instructions and diagrams give you a good idea of what it should look like. I don’t think they were the most detailed instructions, but overall it was pretty easy to understand.
I was able to get the conversion down to ten basic steps.
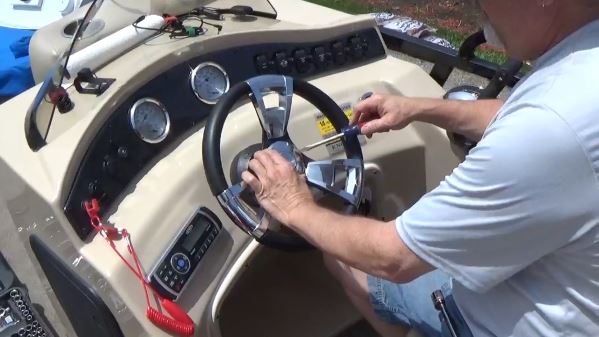
- Remove the steering wheel. Getting the center cap off could be the most difficult. But once you pry the cap off (without scratching or nicking it) remove the nut and lift off the steering wheel. Okay, it’s usually not that easy to lift off. The wheel is installed on a slightly tapered shaft with a Woodruff key (a small half round piece of steel that slips in a slot in the shaft and a groove in the steering wheel. This key prevents the steering wheel from just spinning on the shaft. In my case removing the steering wheel did require a little coaxing with a plastic mallet.
- Remove the mechanical helm. This will require access to the backside of the “dash” and loosening and removing the mounting bolts or nuts. Once done you can slowly lift the old helm unit out if there is enough cable movement or you may need to disconnect the mechanical cable first.
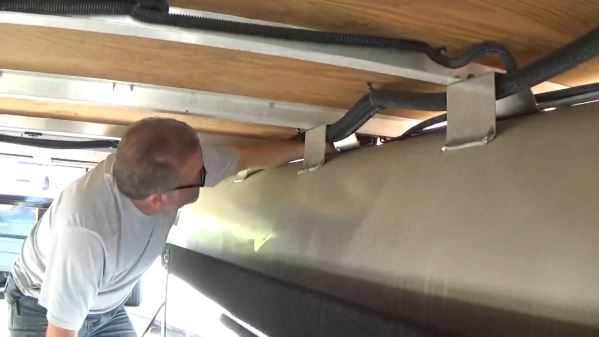
- Once the old helm was removed we disconnected the mechanical steering cable from the engine and slowly fed it down through the floor and under the boat. While I fed the cable through the area above the pontoons, my assistant pulled the cable from the back of the boat.
- Since I was already under the boat we ran the BayStar hydraulic tubing from the rear of the boat, above the pontoons and up into the helm area. Remember, my boat is 20 feet and the hydraulic lines are 20 feet. So you will have a little extra, but do not trim the tubes until the last connection is ready to be made. The tubes come with caps on each end (red and green) so make sure you leave the caps on and even add a little tape to them to keep the caps installed during the process. The caps are there to keep junk out of the lines and so you know which line is which.
- Before connecting the lines you need to make sure the helm unit is ready to install. In my case the hole from the mechanical helm was big enough for the new helm unit. In fact, almost too big. When I lined up the template a couple of the mounting holes were on the edge of the opening. Drill the new mounting holes using the template and your drill. I added a couple of extra washers under the nuts to make sure we had a good grip area. It is easier to connect the lines to the back of the helm before mounting the helm unit. Remember which fitting you connected to which color (you can use left-port-red or right-starboard-green). Install the helm and tighten the nuts; it’s that easy.
- Reinstall the steering wheel using the new Woodruff key and tighten the wheel in place.
- Installing the cylinder to the outboard was pretty straight forward. I’m not going to go into detail but don’t worry that it looks complicated, just follow the installation and assembly instructions to mount the jack plate to the steering arm on the outboard and the support brackets in the transom mount. The biggest issue is clearance when you tilt the engine. So before you cut and install the lines tilt the engine at different positions to see what it looks like.
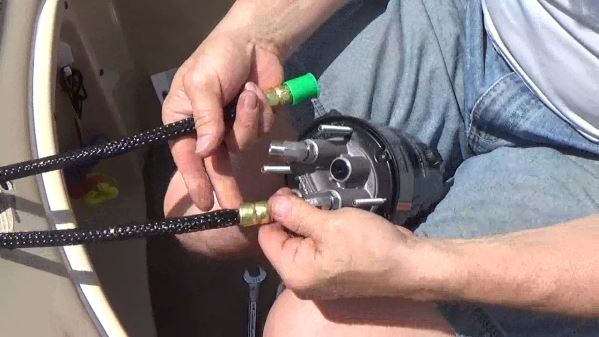
- Install the lines to the cylinders. This is where you might need to cut off excess line. But make sure the routing of the lines clears during turns and when tilting the engine. Make sure you get the correct line to the correct side. This is important. If you hook them up backwards the steering will be backwards. There is not a lot of excess hydraulic fluid to waste removing and reconnecting backwards lines. Not that I know about that. Oh…okay, I hooked them up backwards the first time.
- Fill and bleed the lines. Basically, this is the last thing. The kit comes with a threaded fitting to attach to the fill port on the helm reservoir. Once it’s threaded in you connect the other end of the tube to the cap and install it on the bottle of hydraulic fluid. The vacuum created by the sealed circuit won’t let you fill the reservoir so you need to punch a hole (SeaStar provides a small pin for that) in the bottom of the bottle. This allows the fluid to drain into the reservoir.
- Bleeding the lines and cylinder takes a second person. Where the lines attach to the cylinder are two bleeder screws. One person will need to open the bleeder valve while another person turns the wheel in one direction (direction depends on which line you are working with) to pump fluid into the lines and cylinder. It takes a number of turns of the wheel and it sprays fluid out of the bleeder valve. You want to collect the fluid in a very clean container in case you want to reuse it. Plus it’s not environmentally friendly to let it spray on the ground. The person at the bleeder valve needs to tighten the valve when the fluid stream is steady with no air bubbles. Then move to the other valve, turn the wheel the other direction and do the same thing again. Don’t let the bottle run out of fluid while you are turning the wheel or you force air back in the lines, which is what you are trying to remove. It was almost one bottle of fluid to fill and bleed the air out of the system…until I realized it was backwards. Oops…
Once the system is filled and you are satisfied that there are no air bubbles in the lines, go back over the fittings and connections to make sure nothing is leaking.
Oh and one more thing: I like to follow the lines and install foam wrap (or rigging tape) around the lines in places that they might wear. For example, I protected the lines where they exited the helm station through the wooden deck, a couple places on top of the pontoons as the lines run through formers and at the rear of the pontoon where the lines exit above the pontoon. I also use zip ties to make sure things stay in place.
You might be thinking, “Why didn’t you order it on the boat?” I might have if I ordered a boat.
Or maybe you are wondering why I didn’t have the dealer install it. Well, could be because I didn’t think I needed hydraulic with a 60 horsepower engine. I used the boat for a season before I decided to change it. And I have to admit, I like a good DIY project.
Was it worth it? The real test was taking the boat out and operating it one handed. Yes, what a change in maneuvering and docking!
The BayStar kits (for one engine up to 150HP) can be purchased around $500 on sale. Most new boats with bigger engines already have hydraulic or even power steering. So this is not a project for everyone. But if you have smaller boat or you have an older boat that doesn’t have hydraulic steering, I feel it is a simple, cost-effective upgrade. Plus, if you install it yourself you can save a few more dollars.