As many of you may have guessed, leaving things alone is not the way I do it here in my “toonland.” As I’ve said before, it’s not because I don’t like the original way, but I just can’t seem to leave stuff alone. In fact, when I bought the current ‘toon I thought I was just about set up the way I wanted. But as you have been able to read, that didn’t last.
While I was growing up my dad designed and sold a complete line of bench mounts that would hold the lower units and assorted components of stern drives and outboards so they could be repaired. It was a clever design that allowed you to rotate and access all sides of the lower unit.
He also designed numerous other things that we either used for work or to sell. Many were because he wasn’t happy with what was available and wanted to have something better or different. Oops…that might be where I got the “never the same” issue.
Anyway, as I have shopped new pontoons at shows around the country what I noticed is how much more stuff you can get. The options never end. And the one thing that has intrigued me was changing the color of the pontoons.
I don’t think originally the pontoons were part of the color swatches at the dealer. What I mean is you pick out the panel’s colors, the floor, the interior and even the Bimini colors, but the ‘toons were just aluminum and that’s all there was.
But in the marine world colored hulls have been around for quite a while. Not just gelcoat but aluminum boats too. I really do like “bass boat” metal flake colors, and yeah I still like candy apple red paint jobs too!
When I was growing up my dad bought a burned-out aluminum Naden boat to build a custom ski boat for us to use. We installed a couple of custom swivel seats, a high horsepower (at the time) inboard with a “performance” stern drive unit. It had hide away ropes, a custom ski bar, transom steps, etc., all pretty much handmade.
It was supposed to be a red hull, but when the paint arrived from the paint supply company they had mixed it wrong and it was more of a pastel pink. From a marketing view I never gave my dad credit for this but he decided to go ahead and paint the boat pink and then named it the “Pink Panther.” This was back in the ‘70s which I guess meant psychedelic or unusual colors were not uncommon.
The boat was a standout at the local lake. If you saw this pink customized boat towing skiers you knew where it was from. And did it tow! Somewhere in a box of old photographs is a picture of eight people all being towed at once by a customized pink Naden boat. Thinking back, that was pretty cool and at the time a great guerrilla marketing plan.
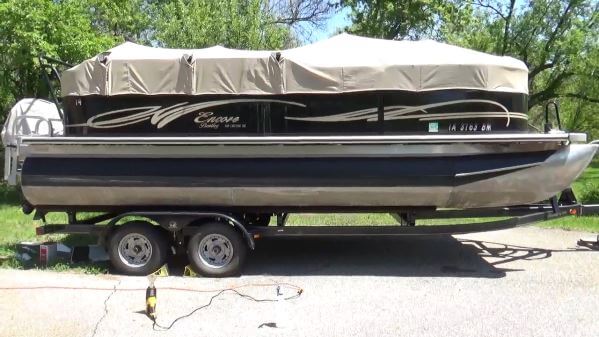
Back to my current pontoons: like every other new boat at the time, my ‘toons started out bright shiny aluminum. But over the past couple years, six months of floating in a slip of fresh green lake water has etched and stained them. I wrote about etching and polishing the ‘toons each season, which is a lot of work. As I also have mentioned that’s why I decided to invest in a lift.
As another modification I added the Vantage bumper strip on the side of the pontoons. Partly to protect them if we tie up to anything, but also to hide the water lines and change the look of the ‘toons.
Well, this year instead of polishing the top half of the pontoons I am opting for the Vantage pontoon wrap. This is a product that is offered and installed through boat dealers, but it shouldn’t be a surprise to anyone that I wanted to do it myself. Vantage makes a few different colors and styles to choose from and if my boat was new, I think I would go for the clear, but since my ‘toons are not the clean, never-used aluminum I opted for the black carbon fiber look.
The carbon fiber look has always been a favorite of mine even if it’s probably passé now. For my Hot Tuner Car book I added carbon fiber to the dash of the Honda Civic tuner car and even had a carbon fiber wing on the trunk. And many tuner cars had carbon fiber hoods which I really wanted.
But now I have the top half of my toons covered in black carbon fiber wrap to go with the black and tan playpen panels. Plus I have the black Mercury Big Foot. How cool is that?
Speaking of cool, I wonder how the carbon fiber look would be on my Harley Sportster quarter fairing?
As I mentioned before the wrap is really sold to the dealers and the dealers are supposed to install, not the owner. In my head the idea behind this is to get it on the new boats before they get all dirtied up.
But on the other hand, if you can add a wrap to an older boat, it helps to improve the looks for very little work and cash. If you have a good older boat that you really like, put more money into something new if you can just make a few changes. There might come time when the new boat might be cheaper than repairing the old, but I’m not sure when that is. Especially when you are talking some basic cosmetic improvements, reasonable upgrades for a boat you like.
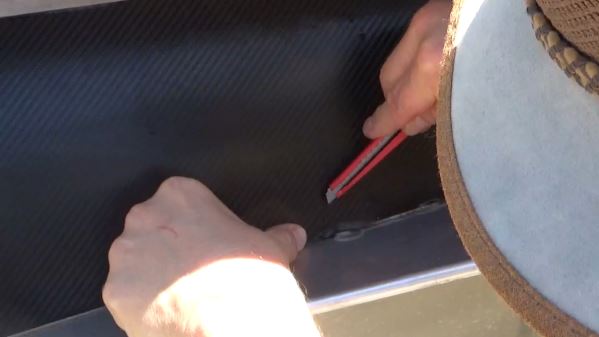
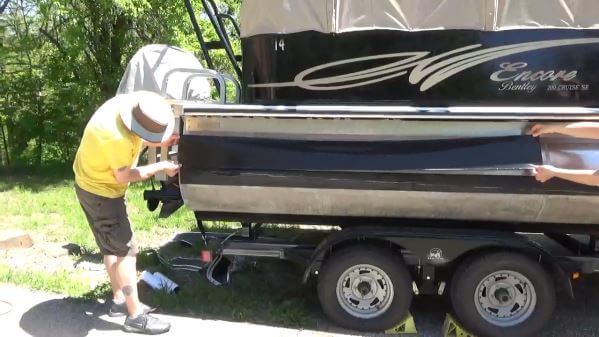
As far as the wrap, it’s a pretty straightforward install. I needed to provide a number of measurements (Vantage does have a lot of the boats already in their system) but since I had the bumper strip they need a few additional measurements to cut the material. I was also prepared to do some additional trimming if necessary.
The kit comes with the wrap cut for each section of ‘toon, basically weld to weld. Each piece of wrap overlaps the previous piece and overlaps the weld. You don’t want a seam on the weld or you take too big of a risk of getting a good contact of the edges.
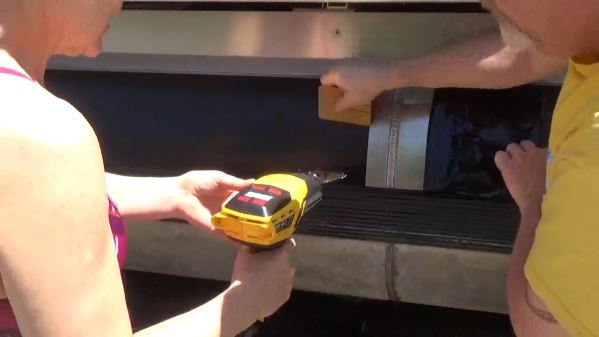
The first thing to do is clean the area of any weld splatter, dirt and stuff. You need as smooth a surface as you can get. Anything under the wrap will create a bump or bubble. The instructions state to clean the area with rubbing alcohol. I thought Everclear would work, but what I ended up using was lacquer thinner. You could also use acetone. The whole point is to remove any grease, oil and crude off the ‘toons so the wrap’s adhesive will bond to the aluminum pontoon.
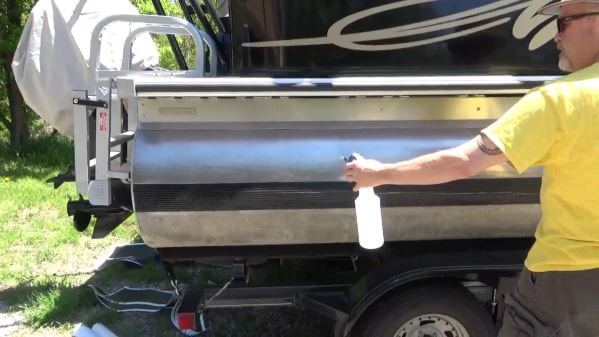
The application solution concentrate is provided and you mix a capful with 32 ounces of water in the included spray bottle. The solution smells and looks like shampoo and it activates the adhesive and allows the wrap to slip, slide, and be adjusted. Once it is in place as the water evaporates the adhesive should take over.
Once the ‘toons are cleaned, starting at the rear, spray the included application solution onto the tube and your fingers. Spray just the first section that you are going to be applying the wrap to; you don’t want to get too far ahead.
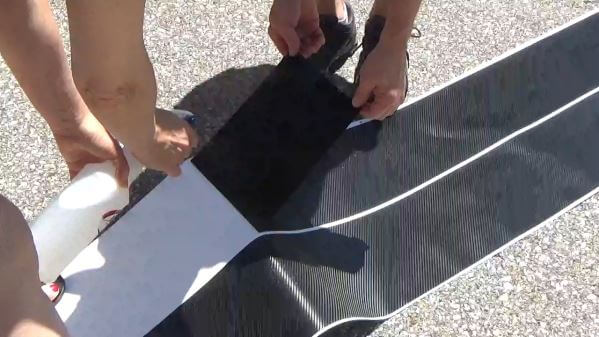
Next as you are peeling the backing off the wrap, start spraying the solution onto the wrap. This is kind of a two-person job, one to pull the wrap free from the backing and the other to hold the end of the backing and spray the wrap.
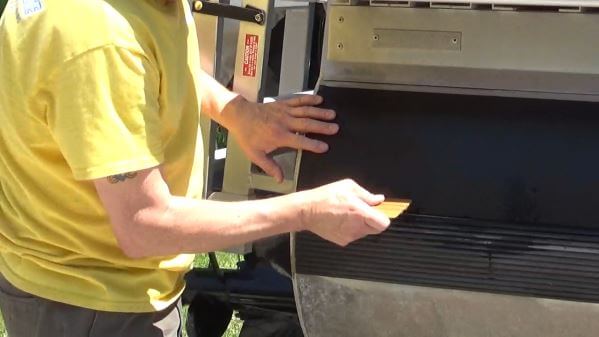
Once the wrap is coated apply it to the pontoon. You can work the wrap gently into place and can move it slightly. Once it is in place use the included squeegee to squeeze out any air bubbles and excess moisture. Just take your time and it’s pretty simple. This is when you will see small bumps of you didn’t clean off the ‘toons! But now it’s really too late to clean them off.
It’s the same process for the second piece of wrap. Spray the pontoon, peel and spray the wrap, stick it in place and squeegee out the air and moisture.
Make sure you overlap the wrap over the weld and first piece of wrap to get a good “connection.” You don’t want the seams together or at a weld. If you use the heat gun to heat the edges it helps speed up the drying process and also helps the wrap stretch over the weld a little better.
Depending on the length of your boat you just keep adding sections until you get to the nose cones. My nose cones required a bit of trimming to get a smooth fit around the welds for the splash fins. But again, it was spray the ‘toon, spray the wrap, install and squeegee, easy peasy.
A number of people have asked me why I added the wrap. I could tell them it is because I wanted the ‘toons covered so the water stains couldn’t be seen. Or I wanted to protect the pontoon surface from future stains and scratches…and it might do all of those things but in reality I think it just looks cool!