Have you had those times when you make plans for all the projects you want to do and nothing gets done? My fall and winter was like that. I was going to put this article together earlier but I got sidetracked with projects that didn’t get me anywhere close to what I really wanted.
Yes, these unexpected projects needed to be done, but really…cutting a hole in my fireplace liner to release a stuck squirrel! That had to happen? Originally my fall plans included cleaning out my shop so I could work on a copper plant stand, a copper pyramid and build a mailbox holder shaped like a five-foot fire-breathing dragon. On a safety side note, I have been told if fire comes out of the mailbox it is not officially Post Office approved. Guess I should have known they have rules about that.
Anyway, by late winter I would be ready to replace the carpet on the ‘toon (at least the front and back), add a few more underwater lights and put Vantage carbon fiber wrap on the top of the ‘toons. Oh, and in there was regular small business stuff like working.
As you might have guessed I’m behind on my schedule. My shop is still a mess and the dragon is still only a sketch on a napkin, but I can say that the copper plant seed starter stand is done!
So by the time you read this I should have my ‘toon already launched and I hope I have enjoyed a number of great sunsets and relaxing days on the water. And depending where you live you probably have your boat in your slip (unless you live way up north), but that doesn’t mean you still can’t do a few early season dock and lift maintenance items.
In my case the docks are owned by the marina and the lift is owned by me. Pretty typical unless you have property directly on the water and own the dock too.
Depending on your dock and lift, getting it back in condition from the winter might not mean anything more than removing the slip cover and greasing and checking the cables. If it is a floating dock it might require putting the dock and lift back in the water.
Or maybe you have one of those docks with a couple of wheels on one end and you roll it down into place.
Whatever you do this is the time for a little preventative maintenance. Just like with a boat, preventative maintenance reduces the overall cost of ownership. Repairing items before breaking them extends the life of the item and reduces the cost of repairs.
It seems common sense but the first thing is to do a very thorough visual inspection of the dock and lift. You are looking for damage and corrosion that might affect the operation and safety of the dock and the lift. Even if the dock is not yours, now is the time to contact your marina and make a request for repairs. I would hate to have a jam or failure late at night while trying to get the ‘toon out of the water in the dark, in the rain, or under pressure.
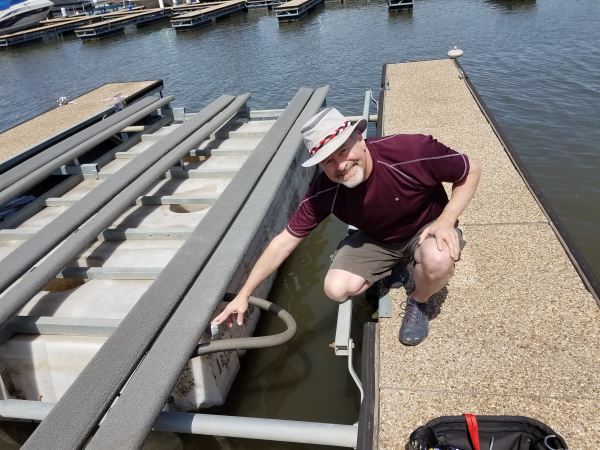
With my lift I don’t have any cables; we have a large air hoses, a valve, electrical cords, an air pump and joints or hinges. For me it’s making sure none of the attachment bolts are damaged or loose and the pivot points are free moving. I also like to take a look at the tanks and their condition. My lift is a bit older so I do worry about age.
Only big thing I needed to do was add an extension to the valve lever so I could reach it easier. To open or close the value requires climbing down on the lift and kneeling almost in the water to reach it and open the valve to lower the boat. So for a simple lift project I made a quick aluminum extension to attach to the existing lever.

After a few quick measurements at the lift I dug a 16-inch piece of 1/8-inch aluminum out of my scrap metal bucket. You can buy this type of material at almost any hardware store. This extension isn’t going to need to be super heavy; it doesn’t take much to move the lever, and it’s just really to make it easier to reach. In my case it needs about three inches to attach to the existing lever and about 10 inches to get the handle out from under the edge of the bunkers. After that I need a short handle to grab. In my case it ended up being about three inches also.
Nice thing about this aluminum is you can really bend it with a vise and a hammer or rubber mallet. I wanted to have the flat extension bent at about 45 degrees or more to clear the bunker and make it easier to grab which takes bit more work in a vise but it can be done. Since I like metal working and tools, I just happen to have a benchtop bender. I made the first bend (keeping the metal as flat as possible and holding it in place with a couple of locking C-clamps (vice grips)) at about the four-inch mark.
I realized I would not be able to get the angle I wanted with just one bend without deforming the material so I made another bend about 8 inches from the first. After that I measured in 3 inches from the other end and made a 90-degree bend for the handle.
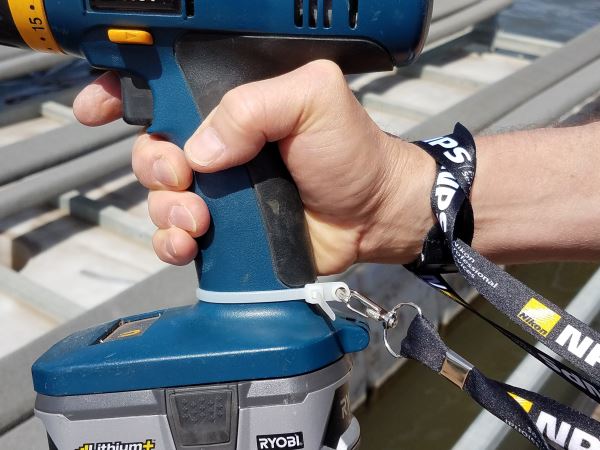
I also drilled two holes in the first three-inch section for attaching the extension to the existing lever. I used 10/24 stainless bolts and also used my cordless drill to make the holes in the handle on the lift. One thing to remember is to always have a lanyard on your tools. I’m not sure about you, but the sound of a wrench, or even worse a cordless drill, falling into the water is very depressing.
Here’s another helpful tip: if you don’t have lanyard attachments on your tools, go to the building supply and buy a bag of zip ties with mounting holes. You can buy a bag of 50 for probably less than ten bucks. Wrap a zip tie around the tool you are using and attach a lanyard with a snap (you know, the one that you got from that last boat show and didn’t know what to do with it) and snap it to the tool. Wrap the lanyard around your wrist and voila, a tethered tool!
Back to the lift, if your lift is cable-operated (manual or power) it’s important to lubricate any pulleys and cables with good quality water-resistant (marine-grade) grease. It’s also a good idea to inspect the cables for fraying loose strands or corrosion and damage. You’re better off replacing the cable before someone or something gets hurt. This is also a good time to spray any cables with a rust and moisture inhibitor.
If it’s your dock, remove any damaged boards or surface sections and replace. If you don’t remove and replace at this time, make a list of what’s wrong and what parts you need to order. Order them so you don’t forget. No one likes to miss a day of boating because you are waiting for parts (boat, dock or lift parts).
Finally, paint or treat any surface material to seal the moisture out. You’d hate to be slipping or sliding off the dock from slick water-logged wood.